|
 Search EP-Cars Search EP-Cars
| |
|
|
|
Visitors: 
|
Home » Free Paper Cars » How to Build... » Busses and coaches


» How to Build... | |
General instructions | Busses and coaches
If you want to know how to turn a plain virtual image of a bus or coach into a concrete object, read below. Note: If you haven't done so before, please read the general assembly instructions. |
1. The parts
|
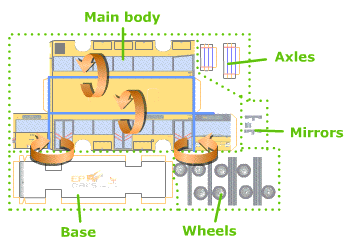
Print the model in the desired scale. Cut the parts attentively on their edges. Should a part contain an orange line, cut on it.

The parts of a paper model bus are:
» The main body, which contains the largest area of the model (the body of the vehicle)
» The base, the part on which the axles and the body are glued.
» The axles and the wheels, that support the model.
» The mirrors, the smallest parts.
|
2. Putting the parts together
|
Fold the front, back, left and right sides of main body at 90-degree angles, as shown in the image above (the blue lines).
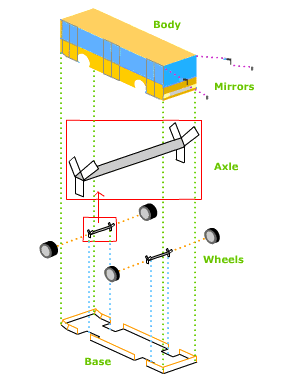
Fold the axles, mirror supports, and extensions of the base as shown in the image below. Note that the front axle is longer than the rear one.
Fill the wheels with a body of material, as indicated in the general assembly instructions.
Glue the front wheels to the longer axle, and the double wheels to the shorter axle.
Glue the axles with wheels, and the body of the model onto the base.
Finally, glue the mirrors to the supports, and the supports to the model.

And you're done!
|
|
|
 Poll Poll
|
|
|
|
|